The Decision That Shapes Everything
Most gardeners fall in love with the idea of a greenhouse long before they've figured out where to put one. They browse catalogs, compare glazing materials, debate aluminum versus cedar frames — and then, almost as an afterthought, they look around the garden and try to figure out where the thing should actually go.
This is, to put it plainly, the wrong order of operations.
Placement isn't a logistical footnote. It is the single most consequential decision you'll make about your greenhouse. Get it right, and you'll have a structure that captures winter sun, stays warm without burning through fuel, stays cool in summer without cooking your plants, and fits the workflow of how you actually garden. Get it wrong, and you'll be fighting shadows, drainage problems, and awkward distances from water sources for the lifetime of the structure.
The good news? The principles are not complicated. They require observation — some of it patient, some of it over seasons — and honest thinking about how you use your garden. What follows is a thorough breakdown of every factor worth considering.
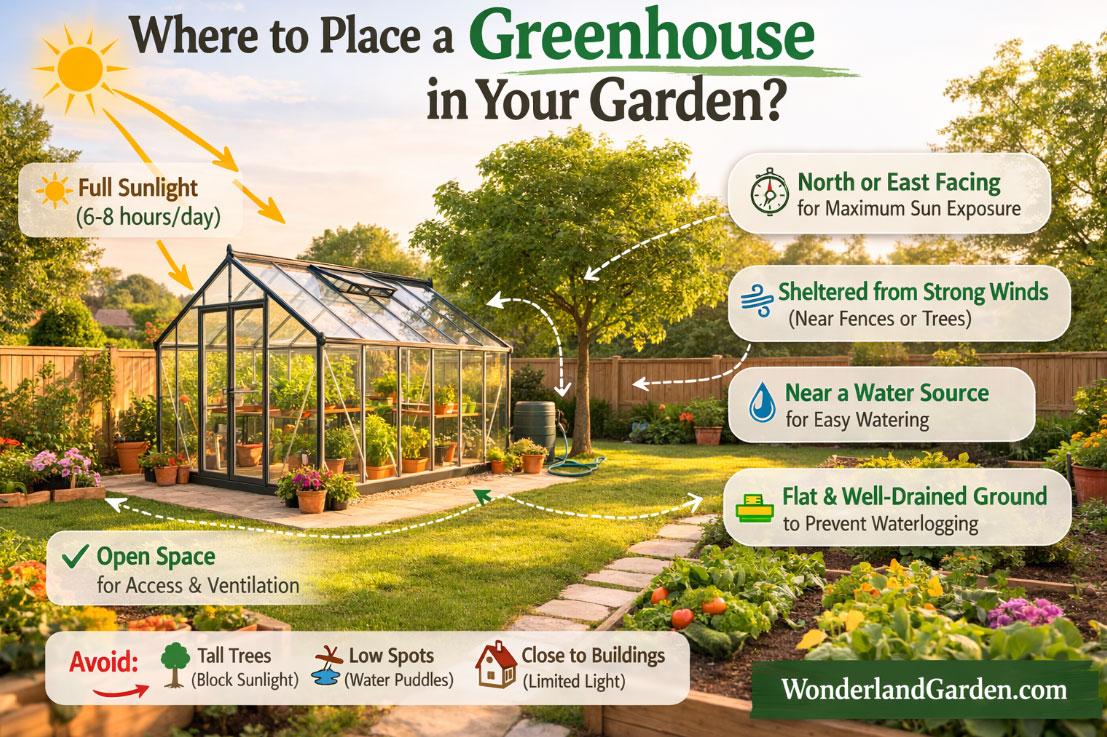
H2: Sun Exposure — The Non-Negotiable Foundation
If there is one factor that overrides all others, it is sunlight. A greenhouse without adequate sun is just an expensive shed.
In the Northern Hemisphere, the ideal orientation is with the longest side of the greenhouse facing south. This maximises the low winter sun that strikes the south-facing glass and keeps interior temperatures viable even during short December days. In the Southern Hemisphere, the reverse applies — face the long side north.
The reason this matters so acutely in winter is the angle of the sun. In summer, the sun tracks high overhead, and a greenhouse in most orientations will catch plenty of light regardless. But in winter, the sun stays low on the horizon. A structure that's partly shaded by a fence, a tree, or a neighbouring building in summer may be completely blocked in December when you need the light most.
What counts as adequate sun?
A minimum of six hours of direct sunlight per day is the standard benchmark for most greenhouse crops. Eight to ten hours is better. If you're growing edible crops year-round — tomatoes, cucumbers, peppers, early brassicas — you want the maximum your site can deliver.
Before committing to a spot, observe it through the seasons if you can. A south-facing wall that seems ideal in August may sit in shadow from 1pm onwards in winter because of a neighbour's extension, a row of evergreens, or even the angle of your own house.
If you can't wait through a full year to observe, there are practical workarounds. Free apps and web tools like SunCalc allow you to simulate sun angles at any location on any date. Walk the garden at solar noon in December (when the sun is at its lowest) and note where shadows fall. Sketch the results.
Avoid These Shadow-Casting Traps
- Deciduous trees: Seductive in summer because they provide dappled light and cooling shade. Useless in winter when you need every photon, because their bare canopy still blocks diffuse light and their roots will eventually threaten your foundations.
- Solid fences and walls: A 6-foot fence to the south of your proposed site may cast a shadow over half the greenhouse footprint on winter mornings and afternoons.
- Your own house: Placing a greenhouse directly against the north wall of your home — even as a lean-to — traps it in perpetual shade. A lean-to should attach to a south or west-facing wall.
H2: Orientation Options and Their Trade-Offs
Once you've identified the sunniest area of your garden, the next question is how to angle the greenhouse within that space.
East-West Ridge Orientation (Most Common)
This is the classic recommendation for maximum winter light. The ridge runs east to west, so the long south-facing slope captures low winter sun throughout the day. This is the choice for growers focused on year-round production and overwintering crops.
North-South Ridge Orientation
The ridge runs north to south, giving both the east and west sides roughly equal sun exposure through the day. This is a reasonable choice in climates where summer production is the priority and overheating is a concern. It avoids the intense afternoon sun on a single face, which can drive temperatures uncomfortably high in summer.
The Lean-To Compromise
A lean-to attached to a house or garden wall has the advantage of using an existing structure for one wall, which reduces heat loss. Positioned on a south or south-west facing wall, it can be highly effective. It also benefits from proximity to the house — easier to run electricity, closer to water, and more likely to actually be used regularly.
H2: Shelter from Wind — The Underrated Factor
Gardeners spend a lot of energy thinking about sunlight and very little thinking about wind. This is a mistake.
Wind is one of the primary drivers of heat loss in a greenhouse. Even a well-glazed structure loses heat rapidly if it's exposed to prevailing winds. The difference in fuel costs — or in the temperature differential achievable without supplementary heating — between a sheltered and an exposed site can be dramatic.
In the UK and much of northern Europe, prevailing winds come from the south-west. In North America, cold winter winds often arrive from the north and north-west. Knowing your local wind patterns is essential.
The shelter paradox
Here's where it gets tricky. You want shelter from wind, but you don't want the structures or planting that provide that shelter to shade the greenhouse. Dense evergreen hedging to the north or north-east provides excellent wind protection without significantly shading a south-facing greenhouse. A solid wall or close-boarded fence can create turbulence on the leeward side — actually worse in some conditions than an open site — whereas a permeable hedge filters and slows the wind more effectively.
Maintain a gap of at least the height of the windbreak between the shelter and the greenhouse. A 6-foot hedge should be at least 6 feet away from your structure.
H2: Drainage — The Invisible Problem Until It Isn't
A greenhouse sitting in a low spot or on poorly-drained ground will give you problems that feel almost unrelated to the poor drainage until you trace them back. Damp foundations lead to condensation, rot in timber structures, and humid conditions that encourage fungal diseases in plants. Flooding, even minor flooding, is catastrophic for seedlings and winter-stored crops.
Before finalising a position, assess the drainage honestly. Does the area sit wet after rain? Is it the lowest point in the garden? If so, either choose a better-drained spot, or commit to proper site preparation — which may involve laying drainage channels, raising the floor level, or installing a rubble base beneath the greenhouse.
The ideal site is slightly elevated — not dramatically so, but enough that water naturally drains away from rather than toward the structure. A gentle slope of even a few inches is a significant advantage.
H2: Access to Utilities — Practical but Often Overlooked
You can site a greenhouse perfectly for light, shelter, and drainage, and still find it frustrating to use because you've put it at the furthest point of the garden from a water source, with no easy way to run electricity.
Consider:
Water: A hose connection close to the greenhouse makes daily tasks practical. If you're relying on a 50-metre hose run from the house, watering becomes an ordeal. Think about whether you can install an outdoor tap nearby, or whether you're close enough to a water butt or rain-harvesting system.
Electricity: Not essential for all greenhouse uses, but heating, supplementary lighting for winter crops, propagation heat mats, and automatic ventilation systems all require power. Running a power supply to a greenhouse involves either burying armoured cable (which needs to comply with local building regulations) or using weatherproof surface-mounted conduit. The further the greenhouse is from your consumer unit, the more expensive and disruptive this becomes.
Paths: The path between your house and your greenhouse will be walked daily, often in poor weather, often with hands full. A well-drained, hardstanding path — ideally wide enough for a wheelbarrow — is not a luxury. If you're placing the greenhouse at the end of a long garden, make sure the route there is practical.
H2: Proximity to the House — Convenience vs. Aesthetics
There's a recurring debate among gardeners about whether to place the greenhouse close to the house for convenience, or further away for visual and practical reasons. Both positions have merit.
The case for proximity:
You'll use it more. This is barely hypothetical — research on allotments and kitchen gardens consistently shows that the closer a productive space is to where you live, the more regularly it gets tended. A greenhouse at the end of a 200-foot garden is an expedition. A greenhouse 20 feet from the back door is a quick visit between other things.
Proximity also makes utility connections cheaper and easier, reduces the distance for carrying heavy compost bags and trays of seedlings, and keeps the greenhouse visible — which means you're more likely to notice early problems like ventilation failure on a hot day.
The case for distance:
Larger gardens often benefit from keeping production areas separate from ornamental areas near the house. A working greenhouse is not always beautiful, particularly in winter when it may contain nothing but propagation trays and bags of compost. Some gardeners prefer to keep it tucked away.
There's also the question of root competition. If you plan to grow in-ground beds inside the greenhouse, you don't want large established trees or shrubs nearby whose roots will invade the soil.
H2: Sloped Gardens — Challenges and Solutions
Not every garden is flat, and a sloped site presents specific challenges for greenhouse placement.
On a moderate slope, terracing is the most common solution. You excavate into the slope on the uphill side and build up a level platform. This typically requires a retaining wall on the uphill side and good drainage to manage the water that runs down and collects against that wall.
On steeper slopes, a lean-to greenhouse built against the uphill-facing wall of a terrace can work beautifully — the retained warmth from the wall adds thermal mass, and the orientation can often be arranged for good solar gain.
Avoid placing a greenhouse at the bottom of a slope without exceptional drainage. Cold air sinks — a phenomenon known as frost drainage or cold air pooling — meaning the lowest point of a sloped garden is often the frostiest spot. The very place water collects in wet weather is also the place cold air settles on clear nights, extending the frost season and making your heating bills climb.
H2: Site Comparison Table
| Factor | Ideal Conditions | Acceptable | Avoid |
|---|---|---|---|
| Sunlight Hours | 8–10 hrs/day | 6–8 hrs/day | Under 6 hrs/day |
| Orientation | Long side facing south (N. Hemisphere) | South-west facing | North-facing |
| Wind Exposure | Sheltered by permeable hedge/fence to N/NE | Partial shelter | Fully exposed ridge or slope |
| Drainage | Free-draining, slightly elevated | Level with engineered drainage | Low-lying, regularly waterlogged |
| Distance from House | Under 20 metres | 20–50 metres | Over 50 metres (no paved path) |
| Power Access | Within 15m of consumer unit | 15–30m (armoured cable required) | Over 30m (significant cost) |
| Water Access | Outdoor tap within 10m | Hose run under 30m | No nearby water source |
| Winter Shade | No shading at solar noon in December | Morning or late afternoon shadow only | Shadow at solar noon in winter |
| Ground Condition | Firm, level, well-drained | Slight slope, manageable drainage | Clay-heavy, waterlogged, soft |
| Proximity to Trees | No trees within 5m | Deciduous trees to north only | Evergreens to south or west |
H2: The Microclimate Advantage
One of the most useful — and least discussed — concepts in greenhouse siting is the microclimate. Every garden contains several of them, created by the interaction of walls, fences, slopes, paving, and planting.
A south-facing brick wall absorbs heat through the day and radiates it back through the evening and into the night. A greenhouse positioned against or adjacent to such a wall benefits from that thermal mass without any additional cost. Temperatures can be several degrees warmer than the ambient air on clear, cold nights.
Conversely, an open, exposed corner of the garden may be several degrees colder than the rest of the plot, catching the wind and draining cold air. The same garden can contain both of these spots within 50 feet of each other.
If you're siting a greenhouse for year-round use, spend some time in the garden on cold, still nights, and in windy weather. Notice where warmth gathers and where cold pools. The instruments you need are your own senses — a cold patch on your face, a frost-free corner where frost forms everywhere else. These observations are worth more than any calculation.
H2: Urban and Small Garden Constraints
Not everyone is working with a half-acre and the luxury of optimal positioning. In urban and suburban gardens, the options are often constrained by existing structures, boundaries, and planning restrictions.
In these situations, the principles don't change — you're still trying to maximise light, minimise wind exposure, and ensure practical access. But you may have to make trade-offs.
Common urban compromises:
A lean-to against the south-facing wall of the house is often the best available option in a small garden. It makes the most of a limited footprint and benefits from the thermal mass of the house wall. A well-designed lean-to with good glazing can outperform a freestanding structure in a more exposed position.
Polycarbonate glazing rather than glass can be worth considering in urban areas, not just for safety where overhead space is limited, but because diffuse light transmission can be better in low-light environments.
Small greenhouses on south-facing patios or terraces — even mini-greenhouses or cold frames — can be remarkably productive when sited with care. A 6x8 greenhouse in exactly the right position will outperform a 10x12 in a shaded, exposed location.
Planning permission: In many jurisdictions, greenhouse structures require permitted development approval if they exceed certain dimensions or are positioned within certain distances of boundaries. Check local regulations before committing to a position, particularly if you're placing the structure close to a fence line or the front of a property.
H2: The Seasonal Test — Why Patience Pays Off
If you have moved to a new property or are developing a previously uncultivated garden, the advice to observe the site for a full year before committing to a greenhouse position is practical, not indulgent.
The garden in January looks nothing like the garden in July. Trees that are leafless in winter provide almost no shade; the same trees in June create deep, shifting shadows. The wet corner that floods in winter may be bone dry in August, giving you false confidence about drainage. The prevailing wind direction may shift between seasons.
A year of observation gives you:
- The true extent of winter shade
- The drainage characteristics of the soil
- The worst wind directions in each season
- The microclimate hot spots and cold spots
If waiting a full year isn't practical, at least observe the site in late autumn and winter before installing the greenhouse in spring. The winter observations are the most informative.
H2: Making the Final Call
At some point, the analysis has to end and the decision has to be made. Most garden sites don't have a single obvious, perfect location — they have several candidates, each with a different mix of strengths and weaknesses.
The framework for making the final decision is straightforward: weight the factors by what you'll actually grow and how you'll actually use the space.
If year-round food production is the goal, light in winter is the highest-priority factor. Accept the trade-offs that come from maximising winter solar gain.
If the greenhouse is primarily for starting seeds in spring and growing tender ornamentals through summer, the balance shifts. Summer ventilation and accessibility matter more than December sun angles.
If you're heating the greenhouse through winter, wind shelter and thermal mass become proportionally more important — every degree you can maintain passively is money not spent on heat.
Write down the top three factors for your specific use, score each candidate location against those three factors, and let the scorecard make the argument. It won't always give you a clear winner, but it will at least make the trade-offs explicit and deliberate.
The Long View
A greenhouse, well-sited and well-maintained, is one of the most durable investments a gardener can make. There are Victorian lean-tos and Edwardian glasshouses still in active use today, their positions chosen by observation and common sense long before anyone had access to sun-angle calculators or drainage surveys.
The knowledge that informs good siting hasn't changed in a century. Find the light. Avoid the frost pocket. Get close to water. Keep out of the wind. Make the path short enough that you'll walk it every day.
Do those things, and the greenhouse will reward you for decades. Miss them, and no amount of advanced glazing or sophisticated heating will fully compensate.
The glass is just the beginning. The ground underneath it is the whole story.
This article covers site selection for domestic greenhouse structures. Always consult local planning regulations and building codes before installation, particularly for structures attached to a dwelling or exceeding standard permitted development dimensions.